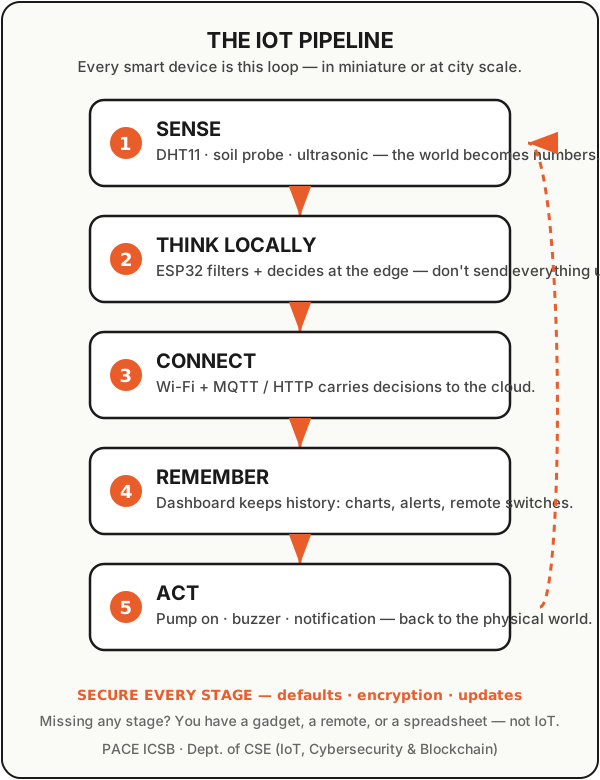
IoT is not magic. It's a pipeline. Every smart device you've ever seen — a fitness band, a soil-moisture alert on a farm, a lab dashboard showing live temperature — does the same four things: sense the world, think a little, send data somewhere, and trigger a response. Once you see the pipeline, every IoT project becomes a variation on one theme.
1 · The pipeline
Picture it left to right: sensor → microcontroller → connectivity → cloud → action. A sensor converts something physical (heat, light, motion, moisture) into an electrical signal. A microcontroller reads that signal and decides what matters. Connectivity carries the decision to the cloud. The cloud stores it, shows it on a dashboard, and can send a command back — switch on a pump, sound a buzzer, push a notification.
If any one stage is missing, you don't have IoT — you have a gadget, a remote control, or a spreadsheet. The pipeline is the whole subject.
2 · Sense — the world becomes numbers
Sensors are the only part of the system that touches reality. A DHT11 reads temperature and humidity; a soil-moisture probe reads water content; an ultrasonic sensor measures distance with sound. Beginners often skip this stage mentally and jump to code — don't. Bad sensing guarantees bad everything downstream. Placement, calibration and sampling rate matter more than which cloud platform you pick.
3 · Think locally — the microcontroller
Boards like the ESP8266 or ESP32 sit in the middle. They read sensors, apply simple logic ("if moisture < 30%, flag DRY"), and handle Wi-Fi. The key lesson: don't send everything to the cloud. Filter and decide at the edge — it saves battery, bandwidth and money. A board that reports "soil dry" once is smarter than one that streams raw numbers all day.
4 · Connect & remember — cloud dashboards
Connectivity (usually Wi-Fi + a protocol like MQTT or plain HTTP) moves data to a platform such as Blynk (our current workshop pick — platforms change, so treat the name as an example; any MQTT-capable dashboard teaches the same stage), where it becomes history: charts, alerts, remote switches. This is where IoT stops being electronics and starts being a system — data you can look at from anywhere, rules that act while you sleep.
5 · Secure every stage — because connected means exposed
Every stage of the pipeline is also an attack surface: sensors can be spoofed, boards ship with default credentials, Wi-Fi traffic can be sniffed, dashboards get left open to the internet. IoT without security is a liability — which is exactly why our degree pairs the two subjects.
Three habits cover most beginner risk:
- Kill the defaults. Change every default password and disable services you don't use — on the board and on the dashboard.
- Expose as little as possible. Let the board reach out to the cloud (outbound MQTT, ideally encrypted) instead of opening your home network in. If you don't know what port-forwarding does, don't do it.
- Update the firmware. Unpatched boards are how small projects become botnet members. Check for updates the way you update your phone.
Want the attacker-eye view? Work through our ethical hacking beginner's map after your first build — you'll recognize every target it describes.
6 · Your first build
Our standard starter path, the same one used in our Sensors-to-Cloud workshops:
- Blink + read: wire one sensor, print values to serial. Nothing else.
- Decide: add a threshold and an LED or buzzer response.
- Connect: push the readings to a Blynk dashboard over Wi-Fi.
- Close the loop: add a remote switch or automation rule from the dashboard back to the board.
No board yet? Simulators teach the pipeline logic; hardware teaches the physics. Start simulated if you must — go physical the moment you can.
Three evenings, one cheap board, and you'll have built every IoT system ever made — in miniature. Then scale up: more sensors, better power design, real enclosures, real deployments. That's exactly what our IoT & Smart Systems track is built around. Still choosing a direction? See how IoT compares in our three-track specialization guide.
7 · FAQs
Do I need an electronics background to start IoT?
No. Start with one sensor and serial output, exactly as section 6 shows. The electronics you need is learned one wire at a time — the pipeline mental model matters more than any single component.
ESP8266 or ESP32 for a first board?
Either works. The ESP32 has more headroom — more pins, Bluetooth, a faster processor. Don't overthink the first board; outgrow it, then upgrade.
Why not send all sensor data to the cloud?
Battery, bandwidth, cost, and latency. A board that reports "soil dry" once is smarter than one streaming raw numbers all day — decide at the edge, send conclusions.
How do I keep a beginner project secure?
Change default credentials, let the board reach out to the cloud instead of opening your network in, and keep firmware updated. Section 5 covers all three habits — then take the ethical hacking map to learn why attackers care.
8 · Sources & further reading
- PACE ICSB programme tracks — where the Sensors-to-Cloud workshop path lives.
- Ethical Hacking: A Beginner's Map — the attacker-eye companion to section 5.
- OASIS MQTT specification (mqtt.org) — the protocol reference behind section 4; verify you are reading the current version.
- NIST Cybersecurity for IoT Program — device-security guidance; verify current publications before citing.